Where to Place CCTV Cameras: A Practical UK Placement Guide
You've got a camera covering the front of the house, the app works, and the manufacturer promises sharp footage. Then a break-in happens. When you review the recording, you see the top of a hood, a bright patch of sky, or a figure disappearing around the corner. The camera worked perfectly. The installation didn't.
After years of walking properties across South Wales and the South West, I've found that where to place CCTV cameras matters more than the badge on the box. A mid-range camera aimed through a narrow gate can produce more useful evidence than an expensive model pointing across an open driveway. The objective isn't to record every square metre. It's to control the geometry of movement, preserve enough pixels for the task, and make sure a person, face, vehicle or delivery passes through a view you can use.
Table of Contents
- Why Camera Placement Matters More Than Camera Quality
- Mapping Your Property for High-Value Coverage Zones
- Ideal Mounting Heights and Viewing Angles for Every Setting
- Common Blind Spots and Placement Mistakes to Avoid
- Example Camera Layouts for Homes Shops Carparks and Warehouses
- UK Privacy Rules and Legal Placement Requirements
- Your Pre-Installation Placement Checklist
Why Camera Placement Matters More Than Camera Quality
A homeowner in Bristol can buy a high-resolution camera after a burglary and still receive footage that identifies nobody. Mounted too high, aimed beyond the approach, or facing a bright window, it may record a hood, glare and a person's outline while missing the face. Extra pixels cannot correct poor geometry.
Start with the route, not the camera specification. Ask where someone must go, slow down, turn, open a gate or pass close enough for useful detail. Gates, doorways, narrow side passages, loading doors and car-park entrances act as constrained spaces, concentrating movement and giving the camera a better chance of capturing identifiable faces, clothing and actions.
Installer's rule: Walk the route a person would take before choosing the camera position. The easiest drilling point is rarely the best evidence point.
Placement also determines pixel density. A wide view may show that somebody crossed the property, yet leave too few pixels to identify them. Narrowing the view at a choke point often produces more usable detail than fitting a sharper camera aimed across an open driveway. Check the expected face height, direction of travel, backlighting and night illumination from the proposed position.
The College of Policing domestic CCTV guidance supports targeted coverage, associating CCTV with a statistically significant 13% decrease in crime overall and noting particular relevance in car parks and, to a lesser extent, residential areas. Its cited reductions include drug, vehicle and property crime.
That evidence does not justify distributing cameras evenly. Prioritise approaches, parking areas, perimeter gaps, vehicle movements and vulnerable external zones before low-risk internal views. A proper survey tests sightlines, lighting, movement, mounting constraints and privacy before anyone drills.
For practical comparison, Brisbane security camera installation principles reinforce the same point. A camera earns its value when its position matches the task.
Mapping Your Property for High-Value Coverage Zones
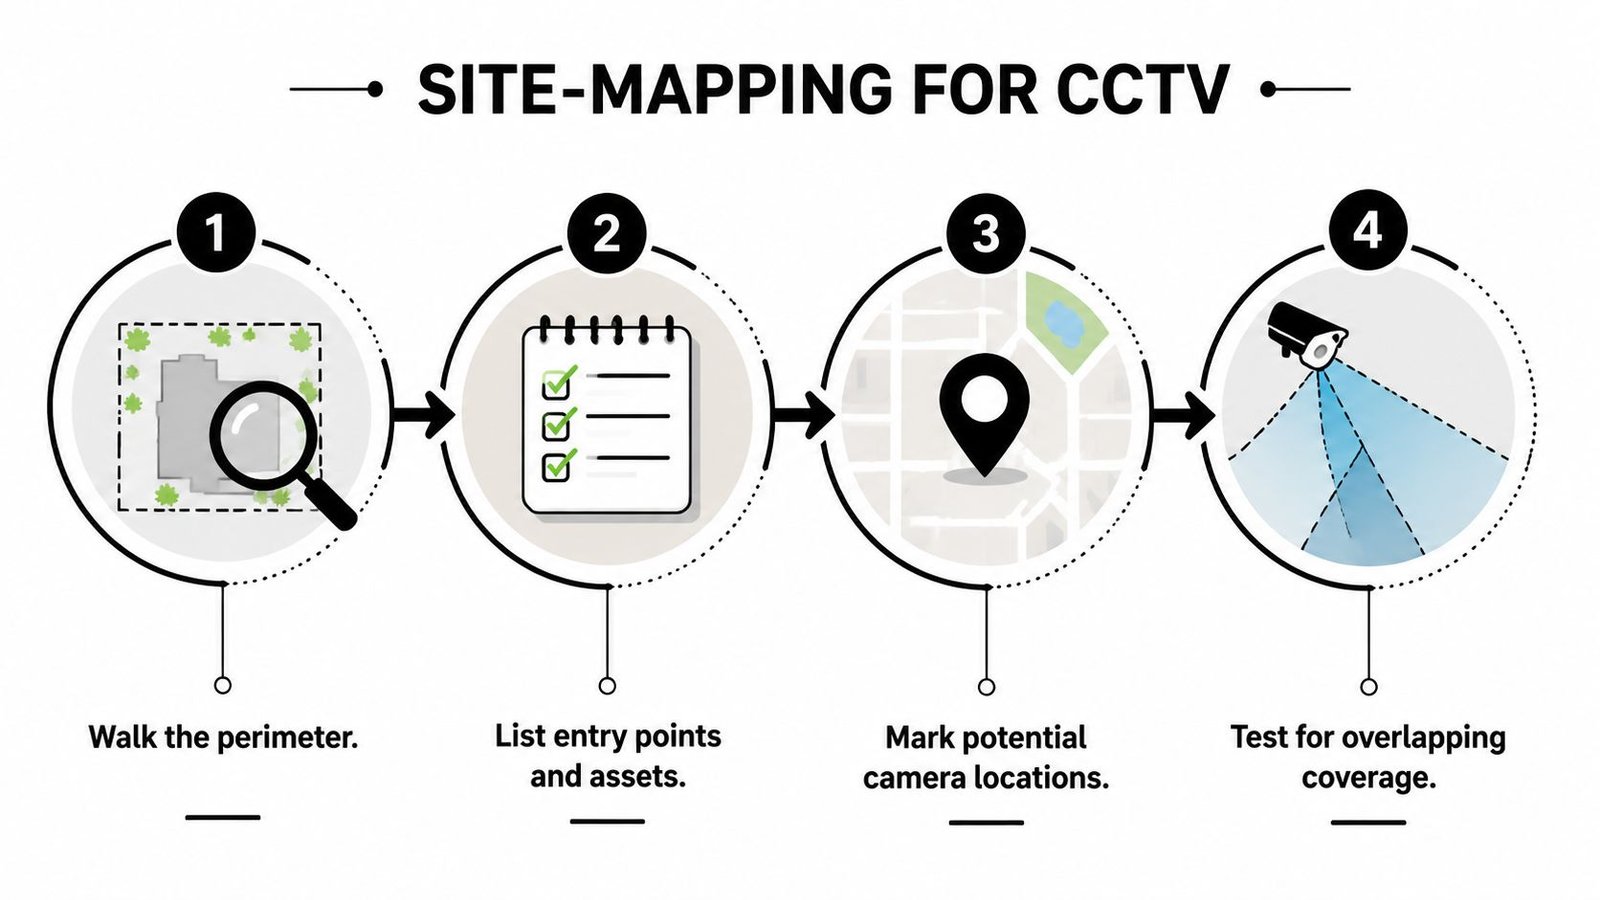
A camera can show that someone entered without showing who entered. I start every survey by mapping movement, choke points and the distance available for usable facial detail, rather than choosing positions around convenient drilling points. Sketch the property on graph paper or a floor-plan app, walk the perimeter in daylight, then repeat the inspection after dark where possible.
Start with movement, not equipment
Mark every route a person or vehicle can use:
- Front access: Record the gate, path, porch and front door. The approach may offer a better face-friendly angle than a camera aimed directly at the threshold.
- Side and rear access: Narrow passages, garden gates and bin routes can conceal an approach and often create a natural identification zone.
- Vehicle routes: Mark driveways, car-park entrances, barriers, delivery yards and turning areas.
- Operational access: Shops should include tills, stockroom doors and rear fire exits. Warehouses need roller doors, loading bays, pedestrian doors and perimeter fencing.
- Internal transitions: Stairwells, corridors and doorways slow or redirect movement, making them useful points for identification.
The College of Policing guidance supports targeted coverage around vulnerable areas. A property does not need an even surveillance blanket. Give the clearest view to the places where people must pass, pause or change direction.
Use three marks on your plan
Use one colour for entry points, another for valuable assets, and a third for blind spots or concealed approaches. Add arrows showing movement between them. Where several routes meet, mark the choke point and assess whether its width, lighting and viewing distance can produce identification detail.
A terraced house may have a front door, rear garden gate and narrow side access. The side route often deserves priority because its restricted width limits movement. A corner shop may need an internal entrance view, a camera covering the till and another watching the rear exit. A warehouse with several roller doors may need separate views at active loading routes, rather than one wide image with weak pixel density across the entire yard.
Test the priority order
Rank each location by the consequence of missing it and the likelihood of unwanted access. A low-risk lawn should not take priority over an uncovered side gate, delivery door or vehicle entrance.
Draw each camera's actual field of view, then check walls, parked vehicles, signs, rooflines, foliage and open gates for obstructions. Record the expected face position, direction of travel, backlighting and night illumination. If one camera must serve two objectives, decide which matters more. A wide view may confirm movement, while a narrower view at a choke point provides the pixels needed to identify the person.
Ideal Mounting Heights and Viewing Angles for Every Setting
Mounting height determines whether you capture a face or only a forehead. The right angle also depends on the task. A camera intended to detect movement can sit differently from one intended to recognise a person at a doorway.
The installer guidance discussed by Clearway's CCTV evidence overview gives a useful framing benchmark. For a 1.6 m human target, the subject should fill at least 10% of picture height for event verification and 50% for recognition, with the detector area fully inside the field of view. Those figures come from the cited UK BS 8418 guidance, so they're more useful than choosing a height by habit.
| Setting | Mounting height | Viewing angle | Pixel density target | Primary objective |
|---|---|---|---|---|
| Entrance recognition view | About 2.4 m indoors | Slight downward angle, face-friendly | At least 50% picture height for recognition | Recognise people |
| Perimeter approach | 2.5 to 3.5 m | Approximately 15 to 30 degrees downward | Size the subject for the task | Detect and verify movement |
| Gate or narrow passage | As low as practical while protected from tampering | Aim along the route, not across it | Prioritise facial and clothing detail | Identification |
| Driveway vehicle view | Set by the plate position and approach geometry | Avoid steep downward views | Test at the actual plate distance | Vehicle detail |
| Warehouse aisle | Height set to preserve aisle detail | Along the aisle or across a controlled crossing | Match the lens to the working distance | Behaviour and movement |
These are starting points, not substitutes for a live test. A driveway camera aimed down from a tall gable may show the car roof while losing the driver's face. A better position can be lower and closer to the approach, with the lens aimed across the route so the person or vehicle presents a useful profile.
Lens selection controls the compromise between width and detail. A wide lens can cover more ground, but it spreads the available pixels across that ground. A narrower lens gives you stronger detail at a gate, till or doorway. Fixed cameras suit defined choke points, while pan-and-tilt models can help with broad areas, although movement can leave a critical location unobserved when the camera is looking elsewhere. You can compare the practical differences between devices in this guide to CCTV camera types.
Practical check: Have someone walk the route while you watch the live image. Confirm the face remains visible when the person approaches, turns, stops and leaves.
For temporary alignment, stable support matters. These camera tripod balance techniques are relevant when you're holding a camera or test device in position before committing to a bracket. Test at dawn, dusk and night, because a view that looks excellent at midday can produce silhouettes when the sun moves behind the subject.
Common Blind Spots and Placement Mistakes to Avoid
A camera can show the whole yard and still miss the only moment that matters. At a doorway, gate or service counter, identification happens inside a narrow choke point. If the subject is too small, backlit or seen from above, expensive hardware will not recover the evidence.
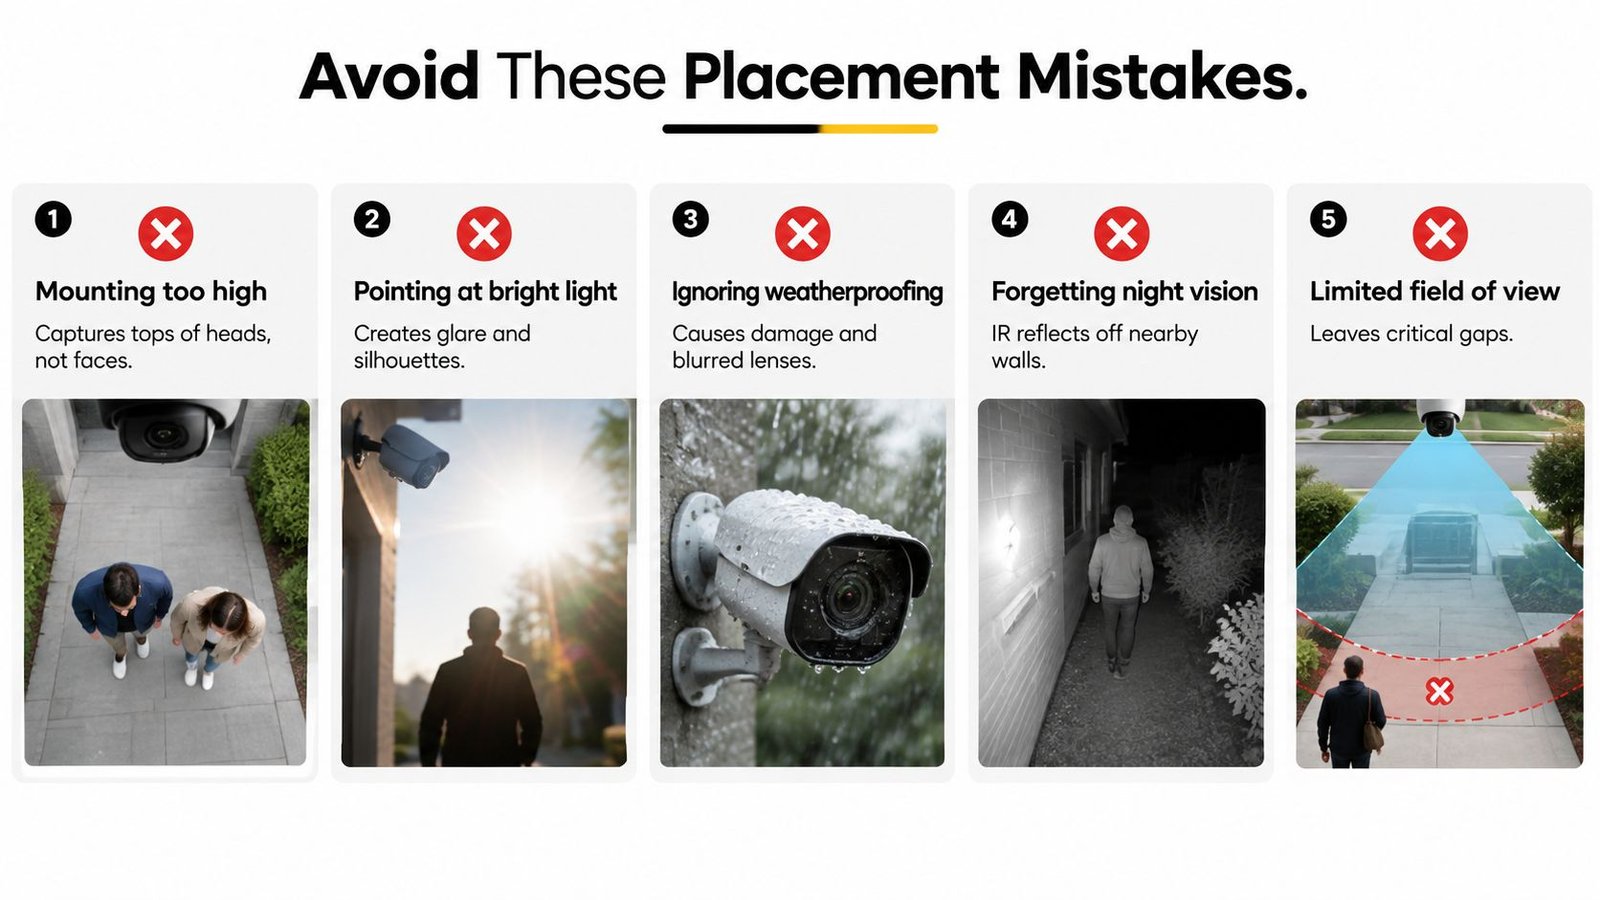
Five failures I regularly look for
- Mounting too high: A camera fixed near a roofline often sees the top of a head instead of a face. Where the building allows, lower the entrance view and aim across the approach. If that is not practical, add a dedicated camera nearer face level.
- Using an overly wide view: A broad image may cover the entire frontage while spreading pixels too thinly for recognition. Narrow the lens or reserve a separate view for the gate, doorway or other point where a person must pass.
- Facing an unshaded window or bright sky: Automatic exposure responds to the brightest part of the scene, leaving an approaching person in silhouette. Set the camera across the entrance, reduce direct glare, or use another angle.
- Ignoring the transition zone: Wall-mounted cameras can lose the area directly below them. Check beneath eaves, canopies and brackets, then overlap views where someone could pass close to the building.
- Forgetting future obstructions: Climbing plants, tree growth, signs and stored stock can turn a clear view into a blind spot. Leave access for cleaning and adjustment, and review the image whenever the site changes.
The UK CCTV security policy guidance stresses limiting coverage to areas under surveillance and avoiding unnecessary intrusion. That approach also improves usable detail. Excluding irrelevant pavement, neighbouring gardens and bright sky leaves more of the available image area for the property and the people within it.
Night vision creates a separate problem. Infrared light can bounce off a nearby wall, soffit or pale sign, washing out the foreground. Test after dark with the lighting that will operate on site. A daytime view does not guarantee the same result at night.
A second camera often resolves a blind spot more cleanly than forcing one unit to cover incompatible angles. Let the door camera handle identity, while a wider side view records approach and movement. Each camera then has one clear job, with deliberate overlap where the subject passes between views.
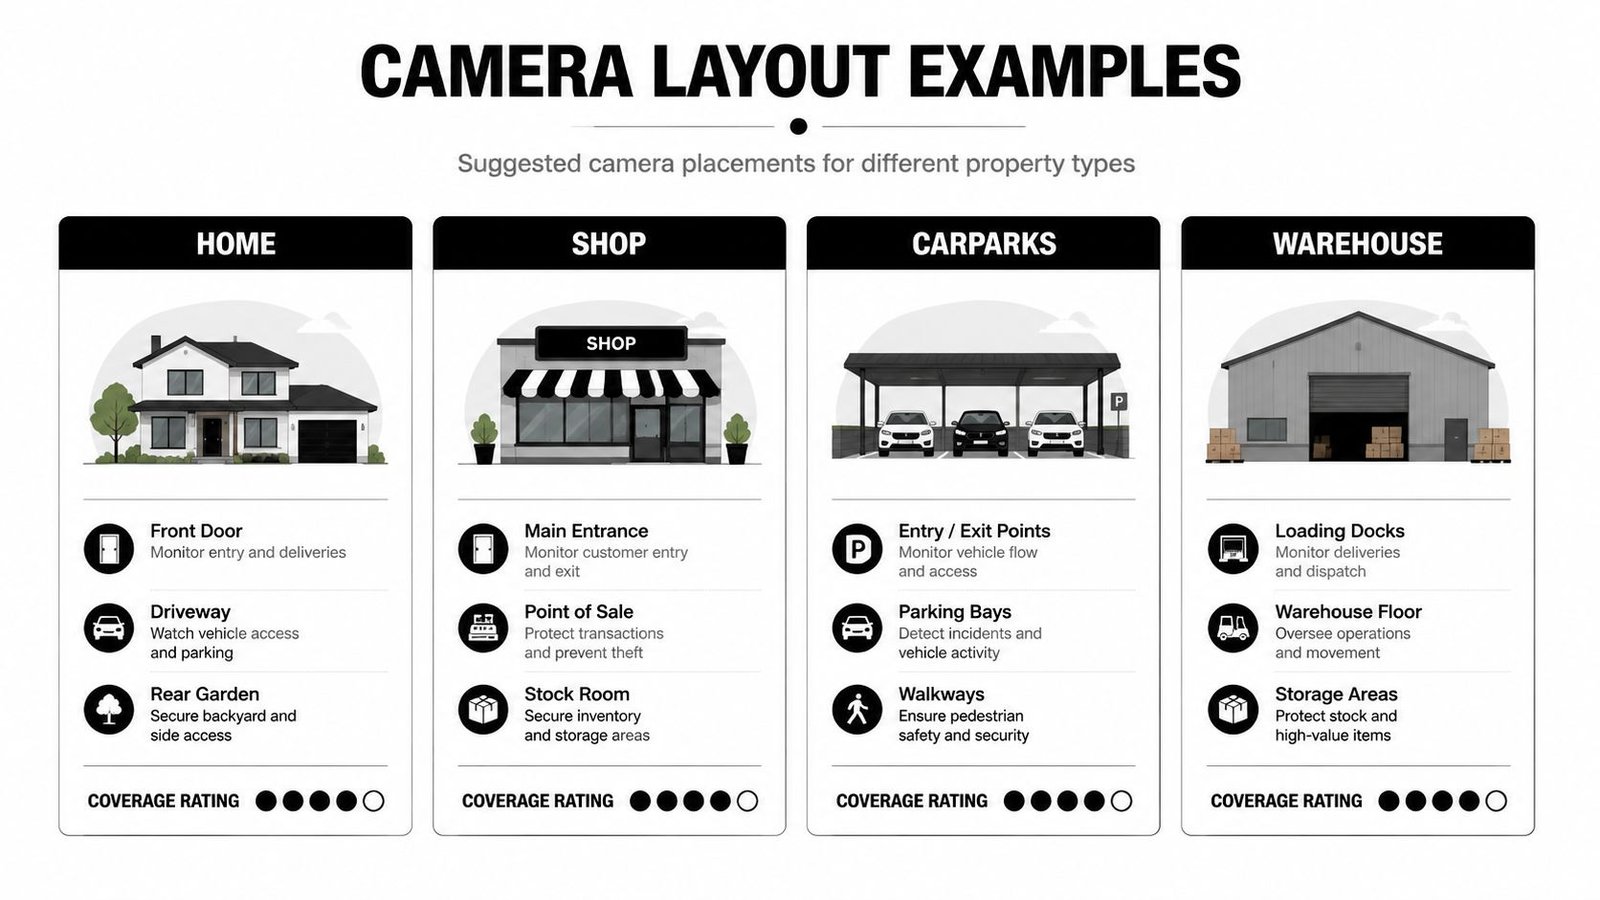
Example Camera Layouts for Homes Shops Carparks and Warehouses
A workable layout changes with the property. The same camera position that suits a house may be useless in a shop, where the till and entrance require different evidence. These examples focus on what each view needs to capture.
Home
For a typical semi-detached house, start with three separate objectives:
- Front door: Place an entrance camera where visitors approach into the view, rather than relying on a distant driveway camera to identify them.
- Driveway: Aim along the vehicle approach and test the image at night. If number-plate detail matters, use a dedicated view rather than expecting a general-purpose camera to provide it.
- Rear garden or side gate: Cover the concealed route where someone can reach the building without crossing the front approach.
Overlap should be deliberate. The driveway view can record approach behaviour, while the door view handles facial detail.
Shop
A high-street shop benefits from a camera inside the entrance, aimed towards arriving faces without placing the doorway directly against bright daylight. A second view should cover the till and transaction area. A third camera can monitor the stockroom entrance or rear fire exit, especially where staff and deliveries use the same route.
The till camera should be close enough to preserve usable detail without recording irrelevant neighbouring areas. A wide ceiling camera may show general behaviour, but it shouldn't replace a tighter view of the point where identity or a transaction matters.
Car park
Separate the entry and exit tasks from general bay coverage. Barrier cameras should face vehicles at a controlled angle, with the lens and lighting tested for the actual approach. Pole-mounted overview cameras can observe movement between bays, but they won't automatically provide plate-quality evidence across the entire surface.
Keep poles, lighting columns and parked vehicles out of the critical sightline. A camera placed near an entrance can also capture people as they leave, when they often pass through a predictable route.
Warehouse
Use fixed cameras at loading-bay doors, pedestrian entrances and perimeter gates. Long aisles need cameras aligned down the aisle or across a defined crossing, not a single ultra-wide view mounted at the end and expected to resolve every movement. A PTZ can help an operator inspect a larger yard, but fixed cameras should protect the essential routes continuously.
You can see how outdoor equipment is commonly matched to perimeter and yard requirements in this guide to outdoor CCTV systems.
The evidential value of these layouts comes from preserving detail at the point of movement. UK research reported footage as useful in 64.9% of crimes where footage was available, and classed it as useful in 72,390 investigations, as described in the Oxford Academic research chapter on CCTV evidence. Placement decides whether your recording joins that useful category or merely confirms that someone was present.
UK Privacy Rules and Legal Placement Requirements
A camera aimed across a boundary can protect one property while creating a data protection problem for another. Check whether its view includes a neighbour's garden, another home, a pavement, road or communal area. The ICO domestic CCTV guidance explains that data protection law can apply when domestic cameras capture beyond the owner's property.
Set the camera to cover the defined access route, not the widest possible scene. Narrow the lens or angle, then use privacy blockers or digital masking where the neighbouring property or public route cannot be excluded. This also protects usable detail. A wide image may show more ground while leaving a face at the gate too small for identification.
Privacy-first placement improves pixel density at the point where a person is recognised. Keep the target zone, such as a doorway, gate or vehicle route, large enough in the frame, while excluding irrelevant background space. In constrained areas, a small change in angle can decide whether the recording shows a clear face or only a side profile.
For overt systems in shops, warehouses and communal buildings, tell people that recording is taking place and limit coverage to a stated purpose. Control access to recordings, retain only what is needed, and review views when entrances, layouts or boundaries change.
Commercial deployments need closer checking than a domestic camera, particularly where employees, customers, tenants or members of the public are recorded. Privacy, signage and access controls should be considered together rather than treated as separate installation details.
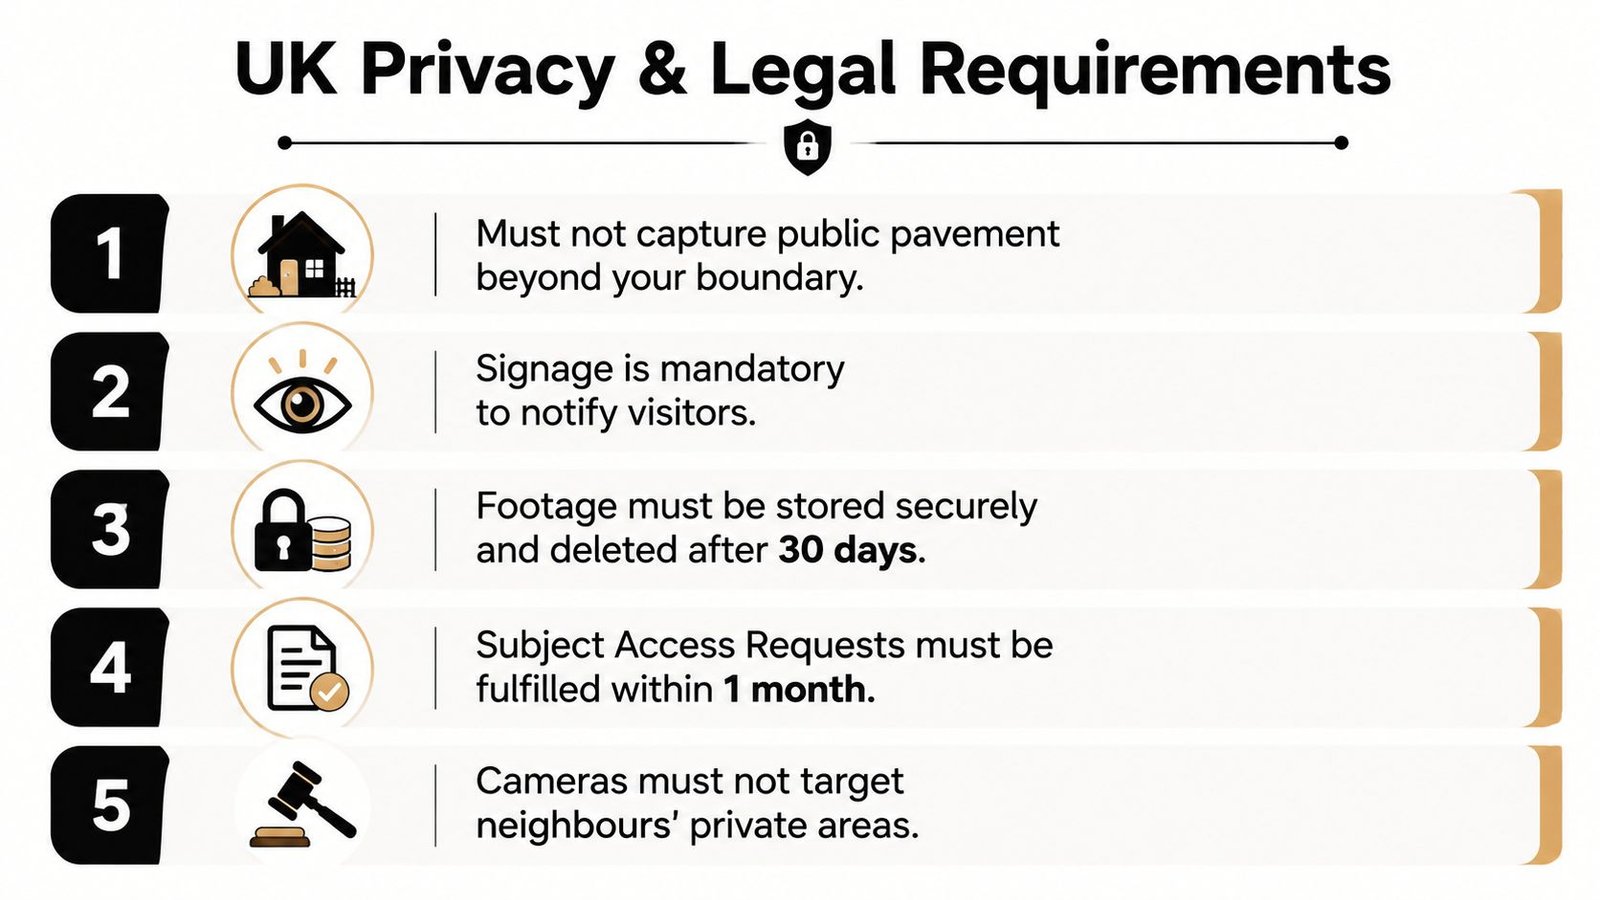
For sign location and wording, use the UK-specific CCTV signage requirements. If a communal or public route must appear in the image, record the reason, reduce the capture area, and apply masking instead of leaving an unrestricted view.
Your Pre-Installation Placement Checklist
Walk the site before buying brackets or drilling. The aim is to place each camera where geometry supports identification, not to produce a wide image.
- Mark choke points: Record gates, doors, loading bays, barriers, stairwells and narrow routes where people must pass or turn.
- Rank the risks: Prioritise entry routes, vehicle movements and valuable assets over open areas with little exposure.
- Define the task: Decide whether each camera must detect movement, verify an incident, recognise a person or capture vehicle detail.
- Match the lens: Use a tighter field of view for faces and a wider view for general movement. One camera rarely performs both jobs well.
- Set height and angle: Use the mounting range established during the survey, then check faces, glare, shadows and the area directly beneath the camera.
- Check pixel density: Confirm that the subject fills enough of the frame for its intended purpose, using the BS 8418 benchmarks cited earlier.
- Test changing light: Inspect the view in daylight, at dusk and after dark. Look for backlighting, reflections and infrared bounce.
- Allow for change: Check foliage, parked vehicles, signs, gates and stored materials that may obstruct the view later.
- Protect privacy: Mask or exclude neighbouring property, public paths and communal areas wherever possible. Follow the GOV.UK CCTV placement guidance.
- Complete the paperwork: On business and shared sites, confirm data protection responsibilities, signage, secure storage and access procedures before activation.
Spend time walking the routes. A camera can record movement for months while missing the face at the point of recognition. Wisenet Security Ltd provides site surveys that check positions, sightlines and practical coverage before installation, with CCTV coordinated with alarms and access control where required.
Wisenet Security Ltd can survey homes, shops, warehouses and car parks across South Wales and the South West, then design around the choke points and evidence requirements that matter. Visit Wisenet Security Ltd to arrange a consultation before anyone drills a hole.