Intruder Alarm System Installation Step by Step Guide
You're usually looking at an alarm because something has changed. You've moved into a new house. The shop has had a close call. The warehouse has grown, and now there are more shutters, more staff, and more chances for a mistake at lock-up. That's the point where the wrong first question gets asked.
They ask what kit to buy.
The better question is what risk the system needs to deal with, how it needs to be installed, and who's going to use it every day without setting it off by accident. In the UK, intruder alarm work has been shaped by formal standards for more than five decades, from BS 4737 to the modern BS EN 50131 and PD 6662 framework, with the current risk-based grading and installation approach taking shape through the PD 6662 updates introduced from October 2005 and then further implemented from October 2007 according to Professional Security's summary of UK alarm standards.
Table of Contents
- What Professional Intruder Alarm Installation Really Involves
- Planning Your System With a Site Survey and BS EN 50131 Design
- Placing Sensors Control Panels and Pet Friendly Detectors
- Choosing Between Bell Only and Monitored Alarm Options
- Commissioning Testing and Handover Done Properly
- Keeping Your Alarm Compliant Maintained and False Alarm Free
What Professional Intruder Alarm Installation Really Involves
A proper intruder alarm system installation starts long before the first cable clip or wireless device goes on the wall. On real jobs, the first visit usually tells you whether the customer needs a straightforward perimeter and trap system, or whether the building has routines and weak points that will punish a lazy design.
A semi-detached house with a dog, a side alley, and patio doors needs one kind of thinking. A multi-unit industrial building with roller shutters, staff access, and shared circulation space needs another. The mistake is treating both as a shopping list of sensors.
It's a protection process, not a fitting job
For UK work, the installation should come from a documented risk assessment and be designed to EN 50131 and PD 6662. Insurer guidance is clear that the design should specify the correct Grade, and for commercial risks Grade 3 is generally regarded as the minimum, with ATS4PLUS often expected for alarm transmission, as set out in Protector's intruder alarm guidance.
That matters because grade, transmission path, detector type, and confirmation method all affect what the system is meant to achieve. They also affect what your insurer expects to see if there's ever a claim or a query after an activation.
Practical rule: If the design starts with “how many sensors do you want?” instead of “what's the risk and who uses the building?”, the job is already drifting.
What good looks like before drilling starts
Before any installation begins, a professional should already have a clear answer on a few points:
- Entry routes: Which doors, windows, rooflights, shutters, and internal routes matter most.
- Use patterns: Who opens up, who closes down, whether cleaners come in late, and whether pets move around after setting.
- Set areas: Full set, part set, night set, or split areas for homes and commercial premises.
- Response path: Bell-only deterrent, self-notification, or monitored signalling.
A decent handover also isn't just “here's your code”. The customer should know how to arm, unset, use part sets, deal with an accidental activation, and spot the difference between a fault and an alarm condition.
Burglary is still a live issue. The Office for National Statistics reported 224,518 burglary offences in England and Wales in the year ending December 2025, a 12% fall from the previous year, and the wider electronic security market in the UK was estimated at approximately £2.35bn in 2017, with around 5% annual growth reported for that year, according to Wisenet Security UK's summary of market context and ONS burglary data. The point on site is simpler. Demand stays strong because people still need reliable protection, and reliability depends more on design and commissioning than on piling in extra devices.
Planning Your System With a Site Survey and BS EN 50131 Design
The site survey is where good intruder alarm system installation is won or lost. You can usually spot future nuisance alarms and blind spots before opening the van. Most of them come from rushing this part.
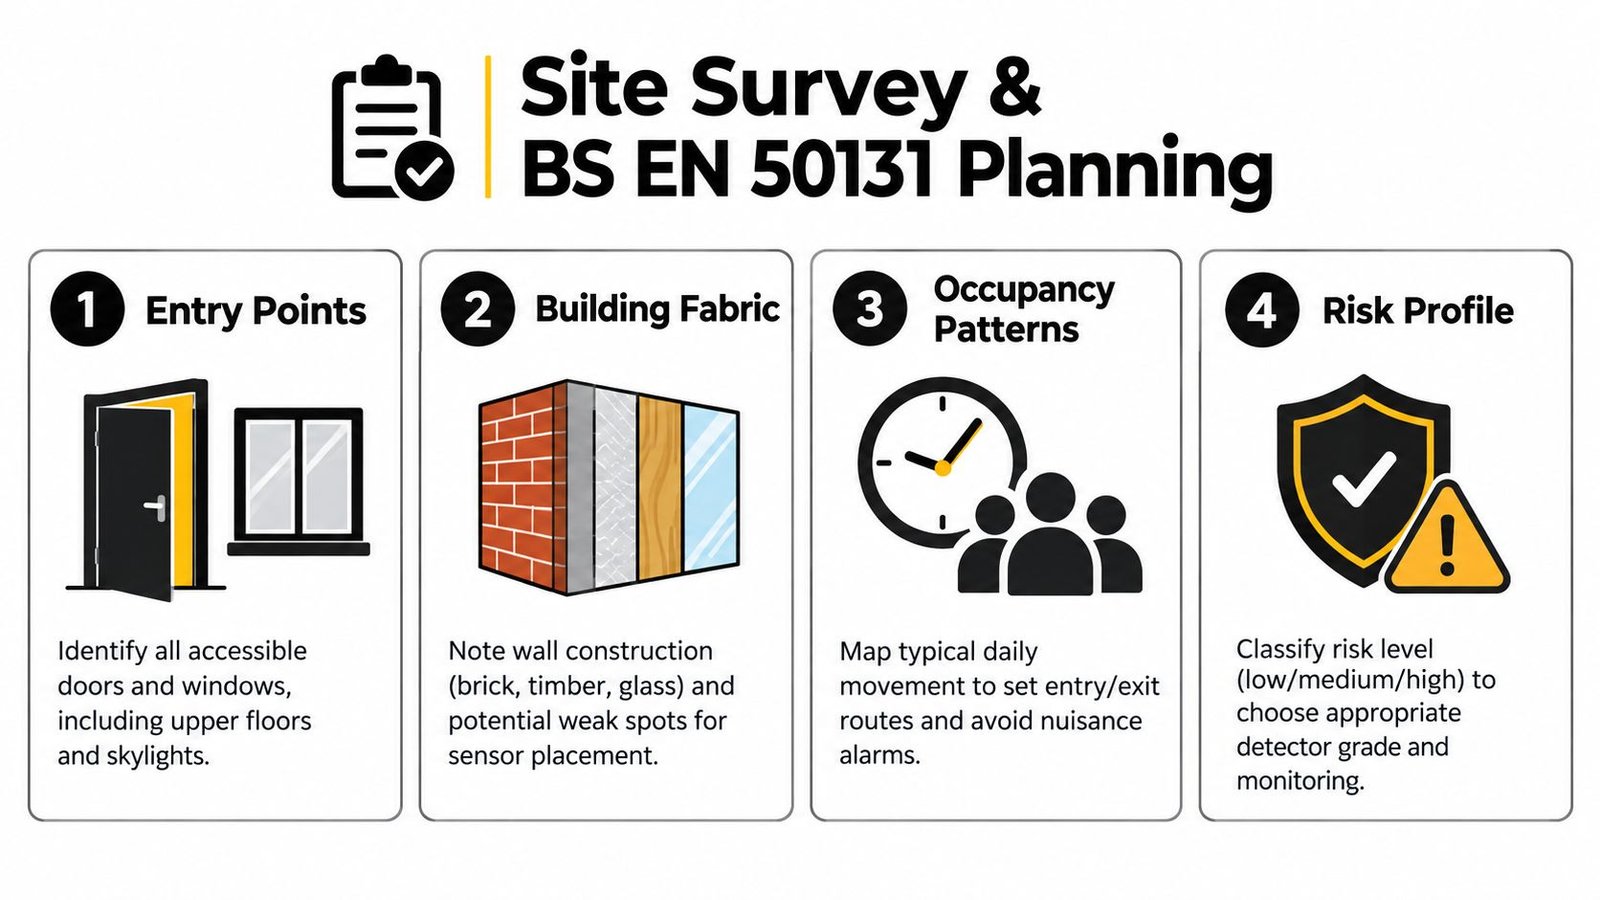
Start with the building as it is actually used
Walk the property with the owner, manager, or whoever locks up most often. Don't accept a floorplan as the whole story. Watch how people really move.
Check these points first:
Accessible entry points
Ground floor doors and windows come first, but don't ignore flat roofs, skylights, rear lanes, linked garages, side gates, and upper windows that are reachable from an extension or canopy.Building fabric
Brick, block, plasterboard partitions, cladding, steelwork, glazed sections, and large open voids all affect where devices can go and how they perform.Occupancy patterns
A family with teenagers coming in at different times needs a different entry route from a warehouse with one shutter used at 6am and never touched again until close.Risk profile
Ask what's at stake. General household deterrence is one thing. High-value stock, sensitive records, or insurer-driven protection is another.
A useful plain-English guide to the framework itself is this EN 50131 overview, but the key point on site is that the standard drives design discipline. It stops installers from throwing in generic layouts that don't match the premises.
Match the grade and signalling to the risk
Insurer-led work often comes unstuck when people choose a panel and detectors first, then try to force the paperwork to fit later. It needs to happen the other way round.
Use the survey to define:
- System Grade: This should reflect the risk, not the customer's guess.
- Alarm transmission path: If the insurer expects a certain signalling standard, that needs confirming before the quote is accepted.
- Setting arrangement: Full set only, part set, separate areas, or staff-specific routines.
- Detector strategy: Perimeter, trap protection, or a mixed approach.
A one-size-fits-all alarm layout is cheap to draw and expensive to live with.
For many commercial premises, Grade 3 is generally regarded as the minimum and ATS4PLUS is often expected where signalling is part of the requirement, as noted in the insurer guidance linked earlier. That's why approved installation matters. If police response or insurer acceptance is part of the discussion, the design, equipment compatibility, and documentation all need to line up properly.
What should be written down
If the survey notes live only in the engineer's head, that's not enough. The specification should record the building risks, the system grade, key device locations, entry and exit routes, setting arrangements, and any customer-specific limitations.
A practical design record should answer:
| Item | What needs defining |
|---|---|
| Premises use | Home, retail, office, warehouse, mixed occupancy |
| High-risk areas | Stockroom, server room, rear access, detached garage |
| User profile | Family, keyholders, shift staff, cleaners, tenants |
| Set modes | Full set, part set, night set, split areas |
| Signalling need | Local bell, app alerts, monitored path |
That's the difference between fitting an alarm and specifying one properly.
Placing Sensors Control Panels and Pet Friendly Detectors
Placement is where neat-looking systems either become dependable or become a nuisance. Most false activations I've seen over the years haven't come from some dramatic equipment failure. They've come from poor siting, weak commissioning, or users who were never shown how the building should be set.
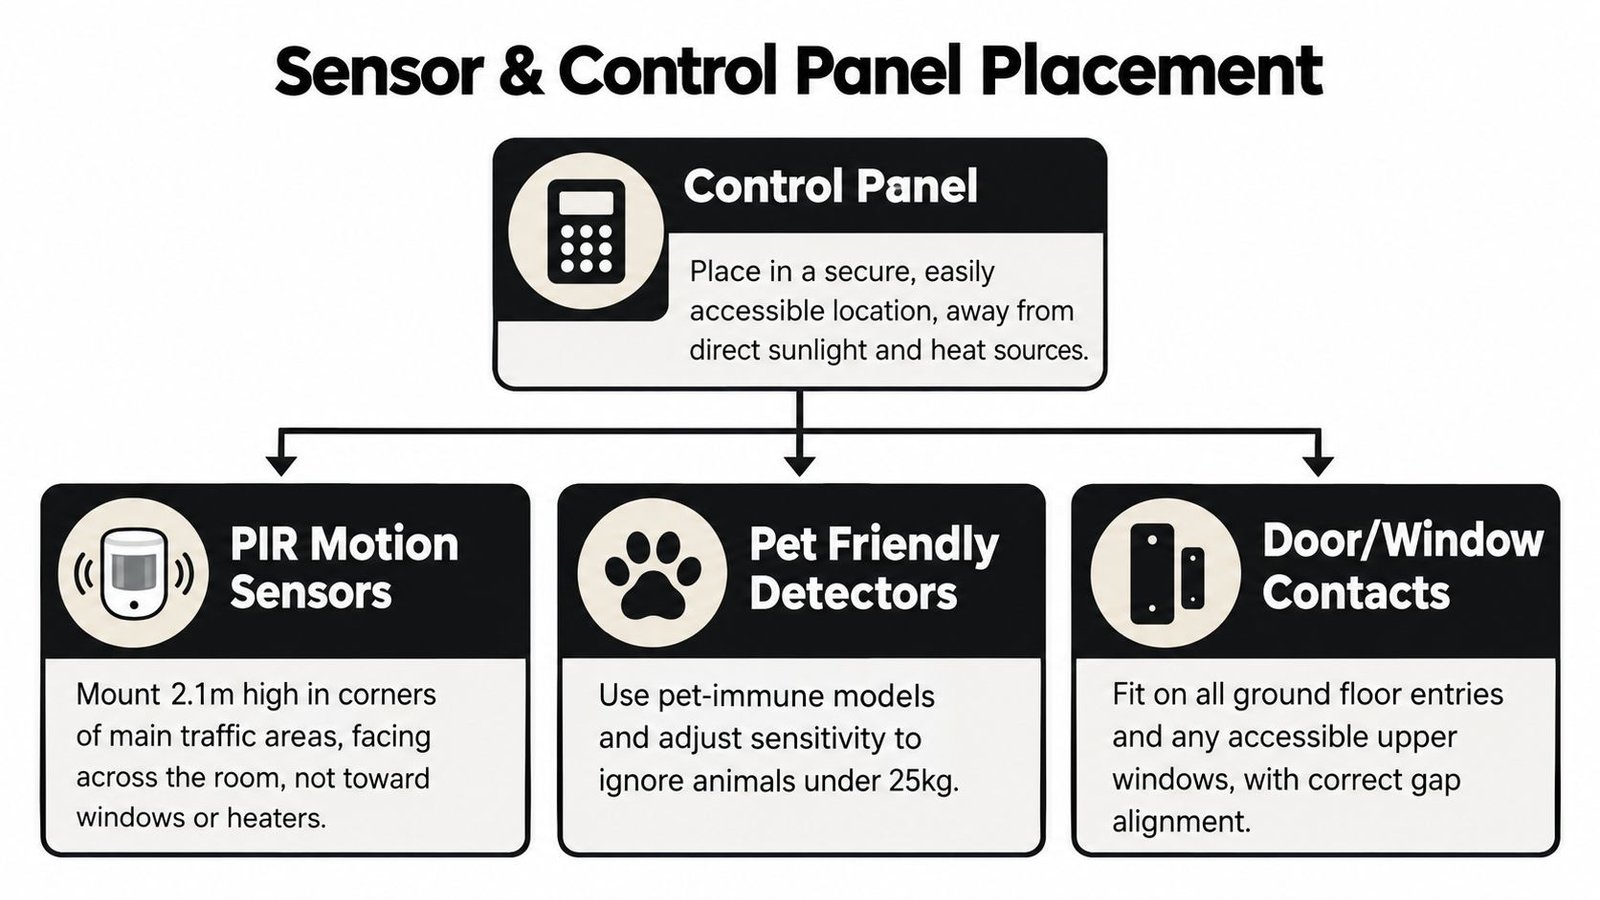
PIRs and dual-tech detectors need thought, not guesswork
A passive infrared detector isn't magic. It reacts to change in its field of view, so where it looks matters.
For most domestic rooms, a corner position looking across the main movement path is stronger than aiming straight at a door. In shops and warehouses, you often want detectors to watch the likely route an intruder would take after entry, not just the opening itself. In stockrooms with unstable temperatures or more challenging environments, dual-tech devices can make more sense than a basic PIR, but only if they're chosen for the space and commissioned properly.
Avoid these common siting errors:
- Facing glazing: Strong sunlight shifts, reflections, and temperature changes can create nuisance conditions.
- Aiming at heaters or plant: Radiators, blowers, and warm air movement are regular troublemakers.
- Ignoring room use: A PIR over a cluttered route where staff stack boxes every week will age badly.
- Forgetting line of travel: Detection is usually better when people move across the pattern, not straight into it.
Later in the process, the installer should prove those assumptions with walk tests, not hope for the best.
Contacts, hallways, and control equipment
Door and window contacts are simple, but they need tidy alignment and the right gap. Front and back doors are obvious. Patio doors, side entrances, garage links, stockroom doors, and vulnerable accessible windows often matter more because they're quieter approach points.
Hallways and stairs usually do the heavy lifting in houses. A well-placed detector on the circulation route can trap movement after entry without filling every room with devices. In commercial units, circulation corridors, rear service areas, and routes from shutter to office often tell you more than the sales floor does.
Control panel and keypad location needs balance:
- Accessible for authorised users
- Not obvious to an intruder on entry
- Away from casual tampering
- Suitable for cable routes or reliable wireless paths
External sounders need to be visible enough to act as a deterrent and mounted where they can't be reached easily.
For households with pets, the detector choice and room layout matter as much as the label on the box. A useful starting point is this guide to pet-immune motion sensors, but the decisions happen in the room itself.
Pet-friendly only works if the room suits it
Pet-friendly detectors aren't permission to ignore behaviour. Dogs jumping off sofas, cats climbing shelves, or pets using stairs within the detector's active pattern will still cause problems if the room is badly chosen.
Useful rules on pet jobs:
- Mount for the intended pattern: Follow the device's installation height and angle so the lower field behaves as designed.
- Keep furniture in mind: A cat that can reach a cabinet top has effectively moved itself into a higher detection zone.
- Use part sets sensibly: Sometimes the better answer is protecting circulation areas and perimeter routes while leaving the pet's overnight area out of the set.
- Test with real routines: Ask where the dog sleeps, where the cat climbs, and whether internal doors stay open.
This short video gives a useful visual sense of detector layout and coverage before final siting decisions are made.
Pets also change wider home safety habits, not just alarm settings. If you've got dogs or cats moving through the property after dark, Pet Magasin's safety guide for your house is a practical companion read because it helps owners think through everyday hazards that can affect both security and detector behaviour.
“More sensors” and “better protection” aren't the same thing if the rooms are busy, the pets roam, and nobody has planned how the set modes will actually be used.
Choosing Between Bell Only and Monitored Alarm Options
Some customers need an audible deterrent and app alerts. Others need an alarm signal that goes to an Alarm Receiving Centre because of insurer requirements, remote sites, or the simple fact that nobody is reliably available to respond. The right choice comes from risk and response expectations, not from guessing that monitored always means better.
A straightforward explanation of the signalling side is available in this monitored alarm system guide. On site, I'd boil it down to one question. When the system activates, who needs to know, and what do they need to do next?
Bell Only vs Monitored Intruder Alarms Compared
| Feature | Bell Only | Monitored |
|---|---|---|
| Alert method | Local external and internal sounders, often with app or phone alerts depending on system setup | Signal sent to a monitoring centre, with agreed response procedures |
| Best fit | Homes, small premises, lower-risk properties, users who can respond themselves | Businesses, higher-risk sites, vacant buildings, insurer-driven installations |
| Ongoing commitment | Usually simpler day to day | Requires maintained signalling and managed response arrangements |
| Police response relevance | Not generally part of the arrangement by default | More suitable where response procedures and compliance matter |
| Cost profile | Lower ongoing outlay in many cases | Higher ongoing ownership cost because monitoring and signalling are involved |
| Main strength | Immediate audible deterrent and simple ownership | Structured off-site handling when keyholders are unavailable |
| Main weakness | Relies heavily on neighbours, keyholders, or the user seeing alerts | Less forgiving if paperwork, maintenance, or user procedures slip |
When bell-only is enough
Bell-only works well when the property is occupied regularly, keyholders are close, and the main goal is deterrence plus fast user notification. For many homes, that's a sensible setup.
It also suits some small businesses where the owner lives locally and checks alerts immediately. If there's no insurer condition pushing the design toward monitored signalling, there's no point paying for complexity you won't use properly.
When monitoring earns its keep
Monitoring starts making more sense when the premises are empty for long periods, keyholders are spread out, or a formal response chain matters. Warehouses, plant rooms, remote offices, and some landlord-managed buildings fall into that category.
There's also a practical overlap with access control. In gyms, managed buildings, and other sites where entry permissions and staffing are being tightened up, alarm design often sits alongside access management. If you're reviewing that broader side of operations, this piece on how to cut payroll costs with automated entry is useful context because it shows how security decisions often connect to staffing and building-use patterns.
Pick the response model that people will maintain and use correctly. That's what holds up under pressure.
Commissioning Testing and Handover Done Properly
Installation day doesn't prove much on its own. Commissioning does. This is the stage that separates a system that behaves itself from one that keeps waking the house, irritating staff, and generating fault calls that should never have happened.
UK false alarm history makes the point clearly. A Police Research Group analysis reported that from 1990 to 1993 the false alarm rate dropped slightly from 2.35 to 2.19 false alarms per system, yet the total false alarms still rose because the installed base increased from 537,848 to 670,710 systems. Over the five years to 1993, more than 92% of alarm calls were caused by equipment, communication, or user error, according to Professional Security's history of the UK intruder alarm industry. That's why detector alignment, user training, and maintenance discipline matter so much.
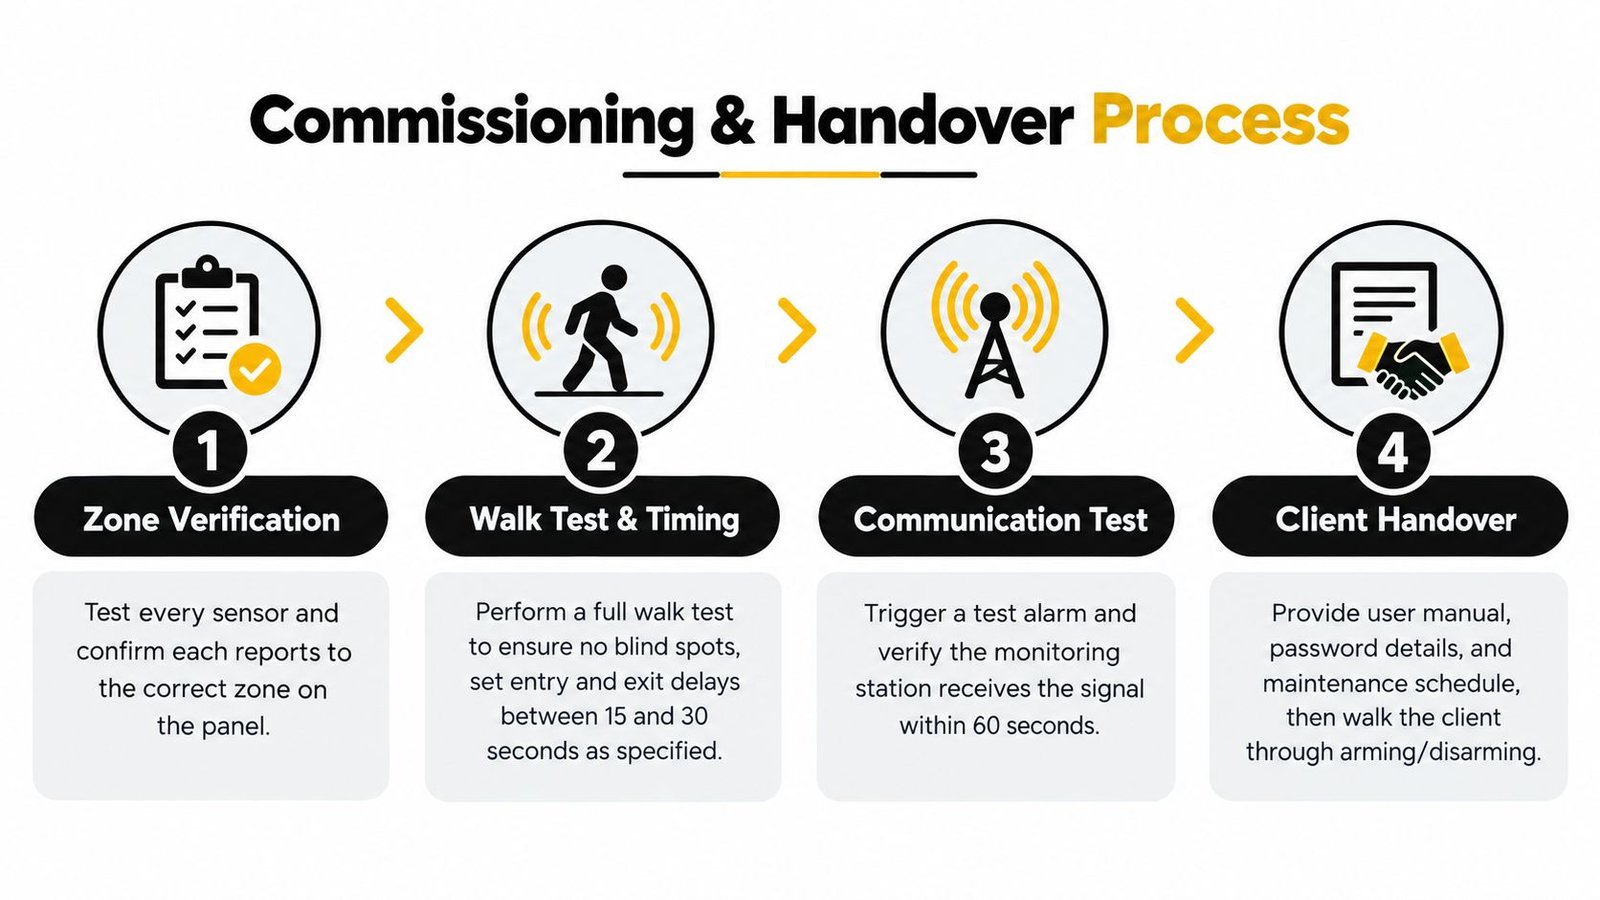
The tests that should happen before sign-off
Every zone should be checked individually. Every keypad function that the customer will use should be tested in front of them. Every set mode should be proved.
A proper commissioning sequence usually includes:
- Zone verification: Each detector, contact, tamper, and sounder reports correctly at the panel.
- Walk testing: Coverage is checked in real movement paths, not just by waving an arm vaguely under a PIR.
- Entry and exit timing: Delays fit the user's route and pace. Too short causes panic. Too long weakens control.
- Communications testing: Any app path, self-notification, or monitored signalling is confirmed live.
- Power and fault checks: Mains fail, restore, battery condition, and visible faults are reviewed before handover.
If a user can't set, unset, and recover from a simple mistake while the engineer is still on site, the handover isn't finished.
Handover is training, not paperwork alone
A lot of nuisance alarms start the first Monday after installation, when someone other than the decision-maker has to use the system. That's why handover should include the users, not just the person who signed the quote.
The customer or key staff should be shown:
| Handover item | What the user needs to know |
|---|---|
| Full set and unset | The exact sequence, not a rushed demo |
| Part set or night set | Which areas stay active and which don't |
| Entry route | Which door to use and how long they've got |
| Alarm memory | How to identify what triggered last |
| Fault conditions | What needs a service call and what doesn't |
| Duress or special functions | Only where applicable and properly explained |
This is also where one body mention is justified. A provider such as Wisenet Security Ltd can install, document, and maintain intruder alarms to BS EN 50131 with user training as part of the process, but whichever installer you use, insist on a complete handover rather than a quick demo on the doorstep.
What the paperwork should cover
The user should leave with enough information to operate the system confidently and enough records to support service and compliance later.
Expect documentation for:
- System layout and zones
- User instructions
- Codes, tags, or credential process
- Service and maintenance details
- Any monitoring or signalling arrangements
- Relevant compliance certificates or records
That paperwork won't stop a false alarm on its own. The handover behind it will.
Keeping Your Alarm Compliant Maintained and False Alarm Free
The installation isn't the end of the job. It's the start of ownership. Most systems that become annoying don't fail because the original concept was impossible. They fail because nobody keeps an eye on batteries, detector conditions, user habits, and changes in how the building is used.
There's also a UK-specific point that catches people out. Ongoing alarm ownership affects more than convenience. Guidance in the market has highlighted that police response depends on approved installation, approved monitoring, and maintained systems, and that systems installed before June 2019 can sit under different compliance expectations than newer ones, as discussed in UK market commentary on false alarms, maintenance, and alarm governance.
What keeps a system reliable year after year
The best routine is boring. That's a good thing.
Keep to a simple discipline:
- Book routine maintenance: Don't wait for repeated faults or random activations.
- Report pattern changes: New pets, altered stock racking, room conversions, extensions, and changed opening routines can all affect detector performance.
- Refresh user habits: Staff turnover and family routine changes create preventable mistakes.
- Take false alarms seriously: One nuisance activation is worth investigating. Repeated ones mean the cause hasn't been fixed.
What usually goes wrong after the installer leaves
A lot of homeowners and SMEs ask whether the alarm is still worth it once maintenance and occasional call-outs enter the picture. It is, if the system is looked after and used properly. It isn't, if everyone starts bypassing zones, ignoring faults, or blaming the kit for user error.
The hidden cost of nuisance alarms isn't just inconvenience. It can lead to friction with insurers, strain keyholder confidence, and create the kind of “nobody pays attention anymore” culture that ruins response when a genuine activation happens.
A badly commissioned alarm with extra sensors is often weaker in real life than a simpler system that's well placed, properly maintained, and understood by the people using it.
If you're responsible for a home, shop, warehouse, or mixed-use property in South Wales or the South West, the sensible next step is straightforward. Review the current layout against how the building is used, confirm whether the grading and signalling still suit the risk, and get recurring false alarms dealt with before they become accepted as normal.
Wisenet Security Ltd designs, installs, and maintains intruder alarm systems for homes and businesses across South Wales and the South West, including bell-only and monitored setups, pet-friendly detection, and standards-led system design. If you want a proper site survey, clear advice on grading and layout, or help sorting out nuisance alarms after a poor install, visit Wisenet Security Ltd.